Saturday, 29 November 2014

3 Final Design Ideas

Here are my three final design ideas for my assessment! 


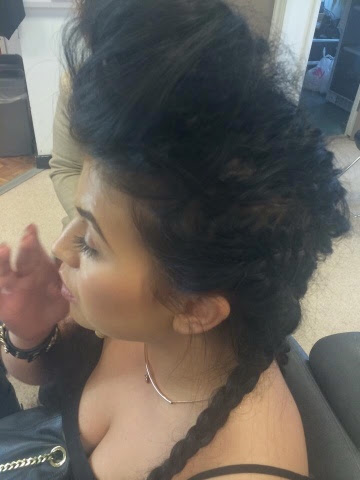
I've decided to use this last design as my final design for my partner, the reason being that it incorporates all the techniques that I learnt in class for an Elizabethan styled hairstyle and gives me room to be creative. Ive decided to use lace with pearls along the parting of the separate plaits as in our practices we both found that because I have micro ring extensions it made it harder to create an even parting. So to add some creativity the lace and pearls adds an Elizabethan element whereas the plaits and hairstyle are quite contemporary. The difficulties my assessment partner may face would be th fact that I have micro ring extensions as you are able to see them once the hair is plaited but this could add to to design in some way. The ends of the hair were going to be frizzed using the 'figure of eight' technique but as the plaiting is going to take some time I decided to use the crimping technique and backcomb them to get a full effect. As you can see in my initial design idea I thought about adding pearl twists to the design to disguise my micro rings but as I'm using the lace I think it may look a little too much so I've decided to leave it. 

In the pictures that sywlia took you can. see that at first we tried frizzing the front and then pinning it back on the head in a quiff like shape which seemed to work well so we've decided to do this for my final design. You can see that my micro rings are clearly visable but we plan on moving the plaits around a bit to disguise them. 


Thursday, 27 November 2014

Contemporary Research - Chanel 2012 Sam McKnight

When looking for Contemporary Elizabethan hair ideas online I came across this hairstyle at the Chanel catwalk in 2012 styled by Sam Mcknight, This hairstyle incorporates loose crimping and also french plaits going up the back of the head. This definitely says Elizabethan to me and the designer must have been inspired by traditional Elizabethan hairstyles with the use of padding, crimping and plaiting being used. Going into detail the adornments used in the hair are pearls and sparkles which gives it a contemporary twist but the pearls bring you back to Elizabeth and her love for them.


I would love to try this hairstyle out as I now know the steps carried out to achieve this look. The plaiting at the back of the head was part of my inspiration for my final design which includes french plaits and also pearls on lace.

Red Heads and Royalty - Assessment Practice - Me as Stylist

In today's lesson with Helen I had the opportunity to work with my assessment partner Toby and practised his final design idea as I haven't been able to practised in previous lessons. 
Toby's design incorporates padding, crimping and curling which are all Elizabethan inspired techniques. 
Firstly, I took a small section at the front of the head and clipped it out of the way to curl later. 
I then sectioned the hair down the middle and created a small plait within each section for the two padding pieces to attach to. Once so had secure the padding to the plaits with grips I then continued to wrap the hair around the padding backcombing when needed to make the hair swell in order to cover the padding. 
Finally I curled the front section in small sections and pinned the curls back onto the head and padding using pins and attached two blue feathers that Toby had added to his design recently to the back of the head with grips.


I found it quite difficult today practising as I hadn't had much time to practise Toby's design but made the most out of the time we had. The left hand side of this picture looks slightly different as I hadn't used the backcombing technique until Lottie advised me to do so. This really have the hair more volume and the hair started to swell enough to cover the padding underneath. The padding on the right hand side is how I plan on creating the shape for my assessment. 

Wednesday, 19 November 2014

Padding

What you will need:
  • Curvy grips
  • Padding
  • Comb
  • Pins 
 Steps
  • First you must take your desired section and platt a small section within to attatch our platt to. 
  • Pin this platt down onto the head using your curvy grips making sure it is secure.
  • Next take your padding and position it onto the head, your grips will now be needed to pierce through the padding and gripped into the platt to secure it (use as many as you need to hold it in place but not too many)
  • Once the padding is secure next manipulate the hair around the padding tucking the hair around it and pinning making sure the ends of the hair are not visable.
  • Once finished you should have your desired volumous look that you can neaten up with pins for any stray hairs.
 Here is my own example of padding:

Assessment Practice as a Hair Stylist

In todays class me and my partner for my assessment practiced his final design in preparation for the assessment in the next two weeks.


His design incorporates padding, frizzing an curling with the two back sections pinned into a heart shape with padding once it is frizzed using the 'figure of eight' technique. The front is pin-curled with several curls pinned longe back onto the head to create a nice waved effect. We have arranged another practice for friday to perfect the padding as this is what I found most difficult working with must shorter hair.

Practising Elizabethan hairstyles - Heartshaped and Improvised Look

Having tried my Elizabethan hairstyles on my dolls head I next practiced my design on real hair creating first an improvised look with padding and curls on m model below.


I decided to leave two strands down at the sides mimicking a traditional Elizabethan style using the 'figure of eight' technique we learnt in class. The back was crimped and then manipulated around the paddig and pinned to secure the hair in place. I curled the front but this time played aound with the curls so that they hung down onto the face as I started to think about a contemporary design for my assessment.

Next I tried padding using a heartshaped design which was extremely popular in Elizabethan times.


I took a section from the back to create a small bun at the base of the head and pinned it into place. The hair at the top of the head was crimped and I then platted a small section for the padding to sit on before I pinned it into place using curvy grips. The hair was then wrapped around the padding to create the heartshaped design and I was very pleased with the outcome. The front of the hair was the hardest part of this design as my model had quite a short fringe so curling and pinning was a challenge so we both talked about how in a contemporary design we would adapt it should we need to and possibly leave the fringe down as this is contemporary and wouldnt be around in Elizabethan times.


Practising Elizabethan shapes and hairstyles

On my dolls head I had a go at creating an Elizabethan styled design using the techniques I'd learnt in class: crimping, padding and curling.


I found doing this design and working with the padding alot easier this time around as I had already been practising my technical skills so applied them to this hairstyle. The curls need to be a little neater and framed more around the face however as this look above makes it look more contemporary.